10. Tensor Cores, shapes, and tile alignment
Tensor Core eligibility, Tensor-pipe saturation, and whole-device efficiency are separate questions.
Tensor Cores are specialized execution units on the SM, separate from the general CUDA cores that execute ordinary scalar and vector floating-point and integer instructions. They are built to perform small, fixed-shape matrix-multiply-accumulate operations directly in hardware, completing far more FLOPs per cycle than the same math expressed as ordinary instructions — but only for the specific data types, tile shapes, and memory layouts that a given MMA (matrix-multiply-accumulate) hardware instruction supports. This is why Tensor Core eligibility is a binary, all-or-nothing condition rather than a smooth efficiency curve: for a given operation, the compiler either emits a Tensor Core MMA instruction, or it falls back to ordinary scalar/SIMT instructions on the same data. There is no partial credit for an unsupported shape or dtype — the operation either fits the hardware instruction's fixed contract or it does not run on the Tensor pipe at all. That all-or-nothing behavior is why the rest of this chapter treats shape, alignment, and layout as correctness-for-performance questions rather than ordinary tuning knobs.
Shape the operation
For , useful work is
A tiled kernel launches approximately
CTAs. If is not a multiple of the number of simultaneously resident CTAs across the GPU, the last wave is partial.
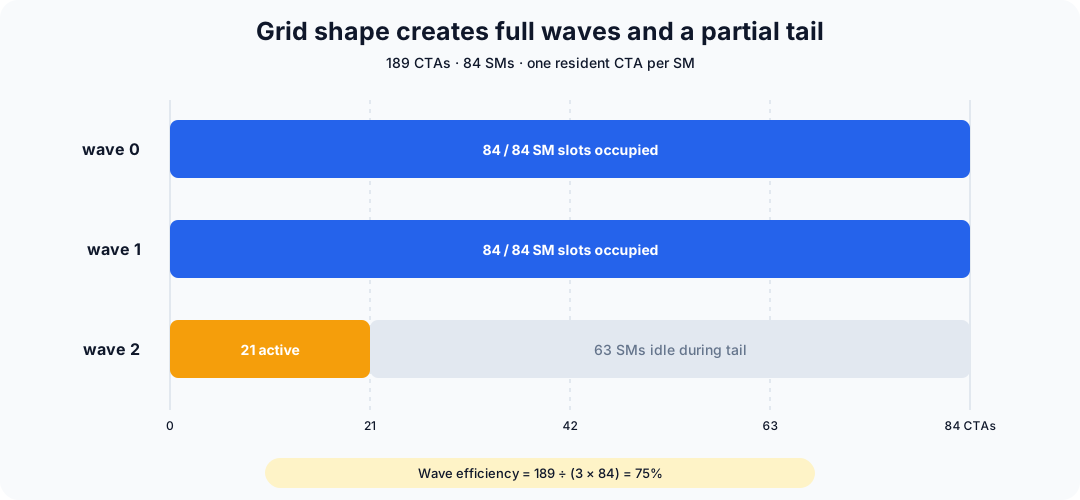
The approximate wave efficiency for SMs and CTAs/SM is
Padding efficiency
Wave efficiency is a device-level tail effect; padding efficiency is the per-tile analog inside each CTA. If a tile kernel computes padded dimensions , useful-work efficiency is
Alignment requirements depend on architecture, dtype, MMA instruction, and library. Record pointer alignment, leading dimensions, strides, and all three contraction dimensions; do not rely on a universal “multiple of 8” rule.
When shape alone can't fix wave efficiency
Wave efficiency and padding efficiency are both properties of the natural shape and the tile size chosen for it. Sometimes neither knob is enough: the shape itself does not produce enough CTAs to fill the device, no matter how the tile is chosen. Two named techniques exist for that case.
Split-K addresses a shape where and are small but is large — the grid formula from earlier in this chapter is computed from and alone, so a small-/large- problem can produce far fewer CTAs than the GPU can run concurrently, leaving most of the device idle regardless of tile shape. Split-K partitions the (reduction) dimension itself across additional CTAs, so each CTA computes a partial reduction over a slice of into a separate buffer, and a small combine/reduction pass afterward sums the partial results into the final output. This turns a grid that was too small to fill the device into one that is, at the cost of that extra combine step and the memory it touches — a cost worth measuring against the wave-efficiency loss it is meant to fix, not assumed to be free.
The persistent-kernel pattern — defined in ch. 8's stall-to-fix section as a grid sized to the device's resident-CTA capacity, with each CTA looping internally over the problem's tiles — is the other lever, and it addresses tail-wave loss directly rather than by reshaping the reduction. Because a persistent kernel's grid never depends on matching a multiple of , it has no partial last wave to lose efficiency to: the same resident CTAs simply keep pulling tiles until the problem is exhausted. This is the pattern behind most modern high-performance GEMM and attention kernels' near-full device utilization, and it composes with the warp-specialization and asynchronous-copy patterns described elsewhere in this chapter rather than replacing them.
Diagnose Tensor misalignment
Combine shape and padding effects with pipe utilization to tell a fed Tensor pipe from a starved one:
| Observation | Interpretation |
|---|---|
| no Tensor instructions; FP pipe busy | fallback path, unsupported dtype/layout/alignment |
| Tensor pipe high; runtime still poor | tile waves, epilogue, memory, or simply large work |
| Tensor and L2 both high | balanced kernel; probably not first optimization target |
| Tensor low; eligible warps high | instruction mix lacks enough MMA work |
| Tensor low; no eligible high | dependency/occupancy prevents feeding the pipe |
Check the exact selected library kernel and SASS instruction mix. For custom code, verify the compiler emitted the expected MMA family rather than scalar or SIMT fallback.
Warp specialization is not ordinary occupancy
Modern GEMMs often assign producer warps to asynchronous copies and consumer warps to MMA. Large register and shared-memory footprints enable deeper pipelines. Symptoms can include one CTA/SM, 17–25% achieved occupancy, sleeping producer warps, and yet 75–85% Tensor utilization.
Treating sleeping stalls or one-CTA residency as defects can dismantle the pipeline that makes the kernel fast. Compare alternative library tiles on the real shape instead.
Practical shape sweep
Once shape, padding, or specialization is suspect, measure rather than reason from formulas alone. Use a library profiler or microbenchmark to sweep neighboring dimensions and layouts:
cutlass_profiler --operation=Gemm \
  --m=4096 --n=4096 --k=4096 \
  --A=bf16:row --B=bf16:column --C=bf16 \
  --verification-enabled=true
Then test the selected implementation end-to-end. A standalone GEMM winner may lose after layout conversion or quantization overhead is included.